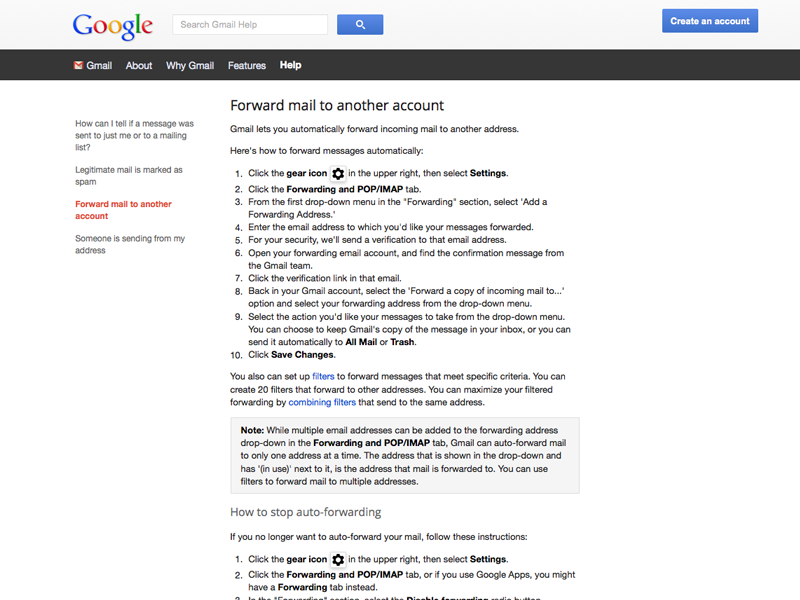
Testing Emails
After you’ve finally figured out how to design and code your first HTML email template (and, of course, your plain-text alternative version), don’t just plop in your content and start sending campaigns. Test your template first to make sure it’ll work in all the different email applications out there. Once you’ve found all the little bugs, and your template is rock-solid, you can start sending.
Hey web designers: Emails aren’t web pages!
If you’re a web designer, you’re probably used to testing web pages in a few different browsers, like Internet Explorer, Mozilla Firefox, and Safari. And you’re probably familiar with a few annoying inconsistencies between all the browsers, and you have a couple hacks to make things look right. For email design, multiply all that by ten. There are tons of email applications out there that you need to test on, and they all render HTML email in their own annoying ways. Do you need to test every single newsletter across every single application every single time you send? Of course not. Just set up a good, simple, solid code base to work from and test it as much as possible. Then all you have to do is swap out content.
Practical Testing
Practical testing involves sending emails to your own accounts across several services. When testing, you should set up accounts with all the browser-based email services. They’re usually free, so it’s easy to set up lots of test accounts. You especially want to look at how browser-based services alter your HTML and CSS. To make it easier on yourself, set up an account at one webmail service (Gmail, for example), then have that account forward your emails to your other test accounts.
Since these services are used by bazillions of people, their anti-spam filters are set really high. When you set up your test accounts with these services, leave their junk mail filter settings to “default.” It really pays to test on these accounts before sending your campaign. You should also take care to leave the image blocking on; show images on individual emails after you check out what they look like image-less, but avoid accepting images permanently from any one email address.
There’s no replacement for practical experience, and testing emails yourself will allow you to more accurately tune your code and design. Use browser-based code inspectors or add-ons (like Firefox’s “FireBug”) to see how your email is rendered by webmail clients, what differences exist between browsers and OS platforms, and to check just how each webmail service meddles with email HTML.
You should strive to, at the very least, test in the most popular 6 email client platforms around. Those are Outlook 2003+ (ugh, we know), Outlook.com, Yahoo!, Gmail, Apple Mail on iOS and OSX, and Google Android email clients. If you can, go beyond those as well; there are lots of email clients floating around out there. It pays to have a look at them.
Third-party Testing
In addition to your own practical testing, it’s good idea to use a third-party testing service. Mailchimp’s Inbox Inspector is powered by one of those services, Litmus.
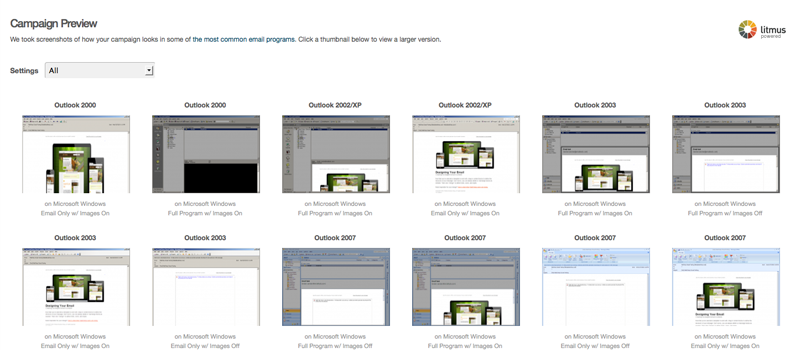
These services test emails across dozens of client, browser, and OS combinations that you may not have access to. Keep in mind that while this option does a lot of the heavy lifting for you, it might be slower than doing it yourself. It’s not a replacement for practical testing, but it’s a fantastic tool to have in the toolbox.